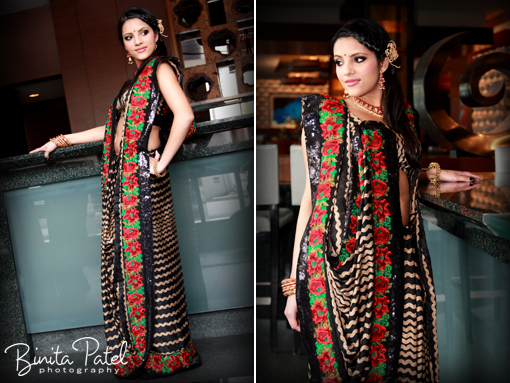
Happy Friday everyone! I have a hot, fashion idea for all my Indian brides to be today that is sure to make heads turn at your Indian wedding. Every time I visit India, I always say to myself I am going to learn to tie a sari in modern, new ways, but I never get around to it. Honestly, I am too busy shopping for gorgeous saris to spend time learning to tie them! But, the best way to give one of your oldie-but-goodies saris a fresh new look is to tie it in one of these five fashionable ways.
I spoke with sari tying expert, Anju Pathak, and here are her 5 tips for Maharani readers to tie your sari flawlessly.
From Anju : The sari is such a versatile garment for the South Asian bride. It can be wrapped, draped and arranged in over 100 different ways – letting each bride create her own unique look and style. And nowadays, there is such a wide range of stylish blouses too: corset, halter, bustier, tube top, thin straps etc. The right blouse can really make a huge difference with your sari style and look.
Understand the fabric – It’s important to know the fabric of your saree. Thick fabrics hold their shape really well, while thinner fabrics such as crepe, georgette and chiffon tend to be “very loose”, and typically work better utilizing very thin and gathered pleats. Since these materials are also very loose, they can also work to create a very slimming look for the bride.
Iron out the wrinkles – I know it can be daunting to iron out 5-6 meters of cloth, but trust me it will be worth it! Wrinkle-free sarees work much better when styling.
Always do a trial run – I always recommend meeting with brides ahead of time to see their sarees / lenghas, and to really understand the material of their dress. Playing around with different styles ahead of time gives you an idea of how things will look on the wedding day, so there are not unexpected surprises.
Lots and lots of pins – Thank goodness for safety pins!! The more creative sari styles certainly do require a lot of pinning, but the trick is to make sure your pins are secured and hidden, so your look stays in place all day long.
Accessorize for style – It’s always nice to add a little extra color, flower, bow, pin, feather, etc to compliment your look. A really fun hair or saree accessory can add new life to even a traditional look.
My favorite of the looks above is the floral brooch style sari that is black & white. I think if Carrie Bradshaw had to go to an Indian wedding, this is the way she would rock her sari. Here is how to tie your sari in this hip, stylish way:
From Anju : Though there can be numerous ways of draping a sari, the most common style involves wrapping a sari once around the waist, creating several pleats at the navel, and draping the loose end (pallu) over the left shoulder, thereby covering the chest. The “floral brooch style” is a modern twist on this common style, and works best with lighter / thinner sari materials.
First, wrap the sari once around the waist counter-clockwise and leave it (don’t create the navel pleats yet).
Then, take the other end (pallu), hold it up and make very thin pleats all the way across (about 2 inches wide). While holding onto those pleats tight, pin them up all together about 4 inches away from the top end of the sari. This way we can secure the floral in and of itself first. After pinning these pleats together, once you let go, you’ll see that this end of your sari will open up into a floral.
Next, pin this whole floral to the front, left side of your blouse.
Then, go back around to your navel, and start making pleats that should be tucked into the front part of your petticoat. Create just enough pleats so that the front part of your sari stemming from the floral and covering the chest is loose and flowy.
Viola! There you have it! Sex and the City meets Bollywood dream wedding!
So this is the final reminder to get your contest entries in by Sunday for our DIY contest where you can win a fabulous gift basket of thank you cards from 3 Bees Paperie. Happy Weekend everyone!


No comments yet.
Please, sign in to leave a comment.